As a WordPress user, you may have come across the term “WordPress memory limit” at some point in your website management journey. But do you actually understand its importance? The memory limit of your WordPress site plays a vital role in its performance and functionality. It determines how much memory your site can allocate for various tasks, such as running plugins, handling incoming traffic, and processing large files.
In this blog post, we will delve into the importance of the WordPress memory limit and provide you with practical tips on how to increase it easily.
Table of Contents
Increasing Memory limit via wp-config.php file:
- One easy way to increase memory limit for WordPress is by modifying the wp-config.php file. To begin, locate the wp-config.php file in the root directory of your WordPress installation.
- You can access this file through your hosting provider’s file manager or by using an FTP client.
- Once you have found the file, make a backup of it before making any changes. This ensures that you can revert back to the original file if needed.
- Open the wp-config.php file using a text editor and search for the section that mentions “WP_MEMORY_LIMIT”. By default, this line may not be present, but you can add it manually.
- Insert the following line of Code: define(‘WP_MEMORY_LIMIT’, ‘256M’); after the line
define( 'WP_DEBUG', false ); this code sets the memory limit to 256 MG, but you can adjust it to your needs. - Save the changes and upload the modified wp-config.php file back to the server. Once the file is uploaded, the new memory limit will take effect.
Increasing WordPress Memory Limit via php.ini File:
Increase the memory limit for PHP via the php.ini file, you can follow these steps:
1. Locate your php.ini file:
Note: Before editing the file, let’s take a backup copy of the file as a precautionary measure,
- Let’s first check out which php.ini configuration file is in use on your hosting server because it differs from one hosting provider to another.
- Typically you can find the php.ini file in the root folder of your hosting package or website. If you face any difficulty in finding out the file ask help from your hosting provider.
To find out the loaded configuration file, create a php file called server-info.php file in your root folder of your website and paste the below code.
<? php phpinfo(); ?>
Then, load the file on your browser. For example, if you have uploaded the above file on your root folder, then load the file by accessing the URL https://yourwebsite.com/server-info.php.
Don’t forget to replace “yourwebsite.com” to your actual website address.
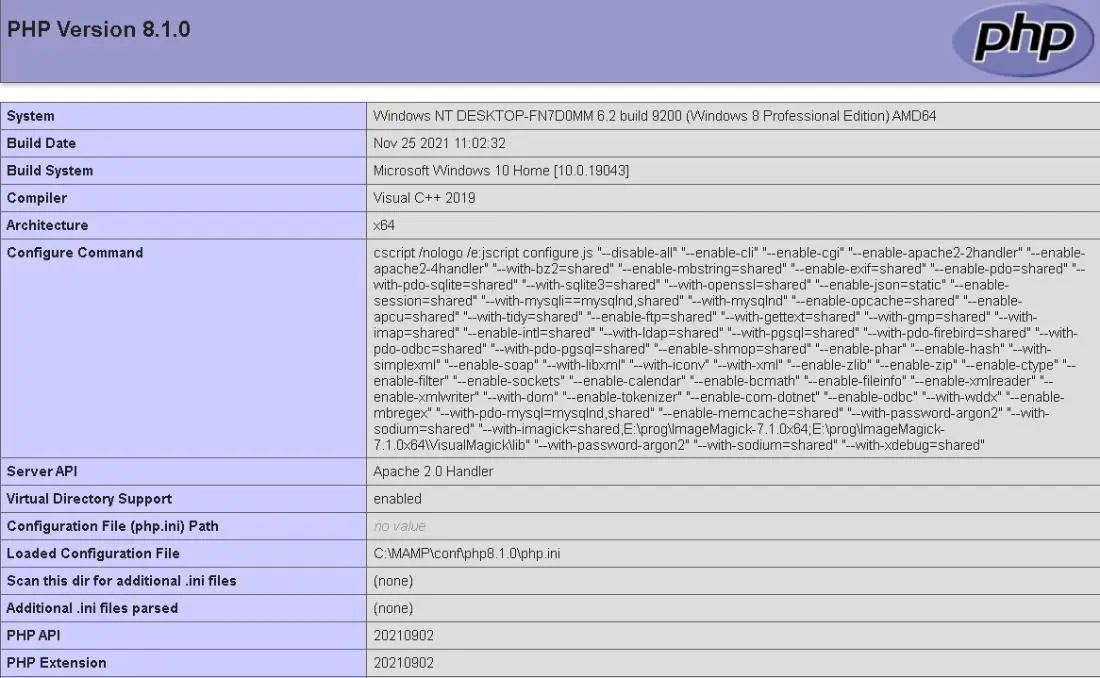
- As you can see from the above screenshot, you can see from which folder, the PHP configuration file was loaded. I am working on my localhost and I am using Mamp for windows, so it is showing the path as C:\MAMP\conf\php8.1.0\php.ini
2. Edit php.ini file:
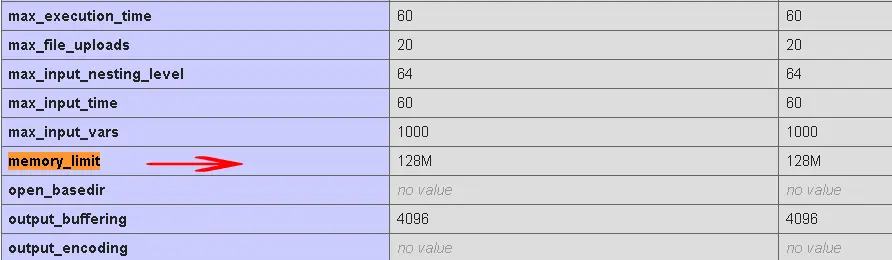
- Look for a line in the php.ini file that contains the “memory_limit” directive. It might be commented out with a semicolon (;) at the beginning.
- Remove the semicolon and modify the value to your desired memory limit. For example set it to 128M or 256M or any other desired value depending on your requirement.
3. Save and upload the modified php.ini file:
- After editing the php.ini file, save your changes and then upload the updated file to the server, overwriting the original version.
- Make sure you upload it to the correct location, as specified in step 1
4. Confirm the modifications to know whether the changes are made or not:
- To confirm the raised WordPress memory limit, you can utilize the WordPress “Site Health“ functionality or employ a plugin such as “WP-ServerInfo“ to inspect the memory limit setting.
- It’s important to mention that some hosting providers do not permit direct access to the php.ini file.
This script will output the current memory limit. Ensure that the displayed value matches the new limit you set in the php.ini file.
Increasing Memory Limit via .htaccess File (for Apache servers):
Note that making any changes to the .htaccess file may result in PHP fatal error or white blank screen of death. Backup the file to your local computer before making any changes to the file. So in case of any error you can always revert back any changes made to the file.
Increasing the memory limit via the .htaccess file is possible on Apache servers. However, keep in mind that this method might not be allowed on all servers, as it depends on server configurations. Here are the steps:
1.Create or edit the .htaccess file:
- Locate the root directory of your website on the server.
- Create a new file named .htaccess if it doesn’t exist, or edit the existing one.
2.Add the following code to increase the memory limit:
php_value memory_limit 256M
3.Save the changes:
- Save the .htaccess file.
4.Confirm the modifications to know whether the changes are made or not:
Create a PHP file for example (server-info.php)with the following content to verify that the changes have taken effect
<?php
echo ini_get('memory_limit');
?>
Access this PHP file for example (server-info.php) through a web browser, and it should display the updated memory limit.
Contacting Web Hosting Provider for Assistance (if necessary):
Contacting your web hosting provider for assistance is a common and appropriate step if you encounter any issues with server configurations or if you need clarification on what’s allowed.
Final Thoughts:
Having a sufficient WordPress memory limit is crucial for ensuring optimal performance and functionality of your WordPress website. By following the steps outlined in our article, you can easily increase the memory limit and prevent any potential issues caused by insufficient memory. If you have any further questions or need additional assistance, feel free to reach out to us. Thank you for reading, and I hope these tips help you enhance your WordPress experience!